5 Easy Ideas to DECORATE Your Space ON A BUDGET

This year I decided to officially move back into my parents house for the entire year of 2021. So yes, I am a 29 year old who is living at home with her parents all in the name of being close to family and saving money to become more quickly financially independent. 

It was actually in 2020 that I first moved in and it was a perfect year to do so with the pandemic and everything going on. I'm so glad I was able to be close to my family and I wanted to extend that into 2021 until we know for sure where things are going to be. I also want to get a clear picture of what I want to do next with my life, whether it's investing in real estate or moving who knows where—the world is my oyster.

Today I’m here to give you a behind the scenes look of where I sleep, work, play, and take you on a tour of my room. I've finally furnished it and settled in. It only took 9 months. I'm finally ready to show you what it looks and give you 5 decorating tips for how to furnish your room on a budget to get your room feeling really cozy and personal and not break the bank. So let's take a look around...

MyRoom

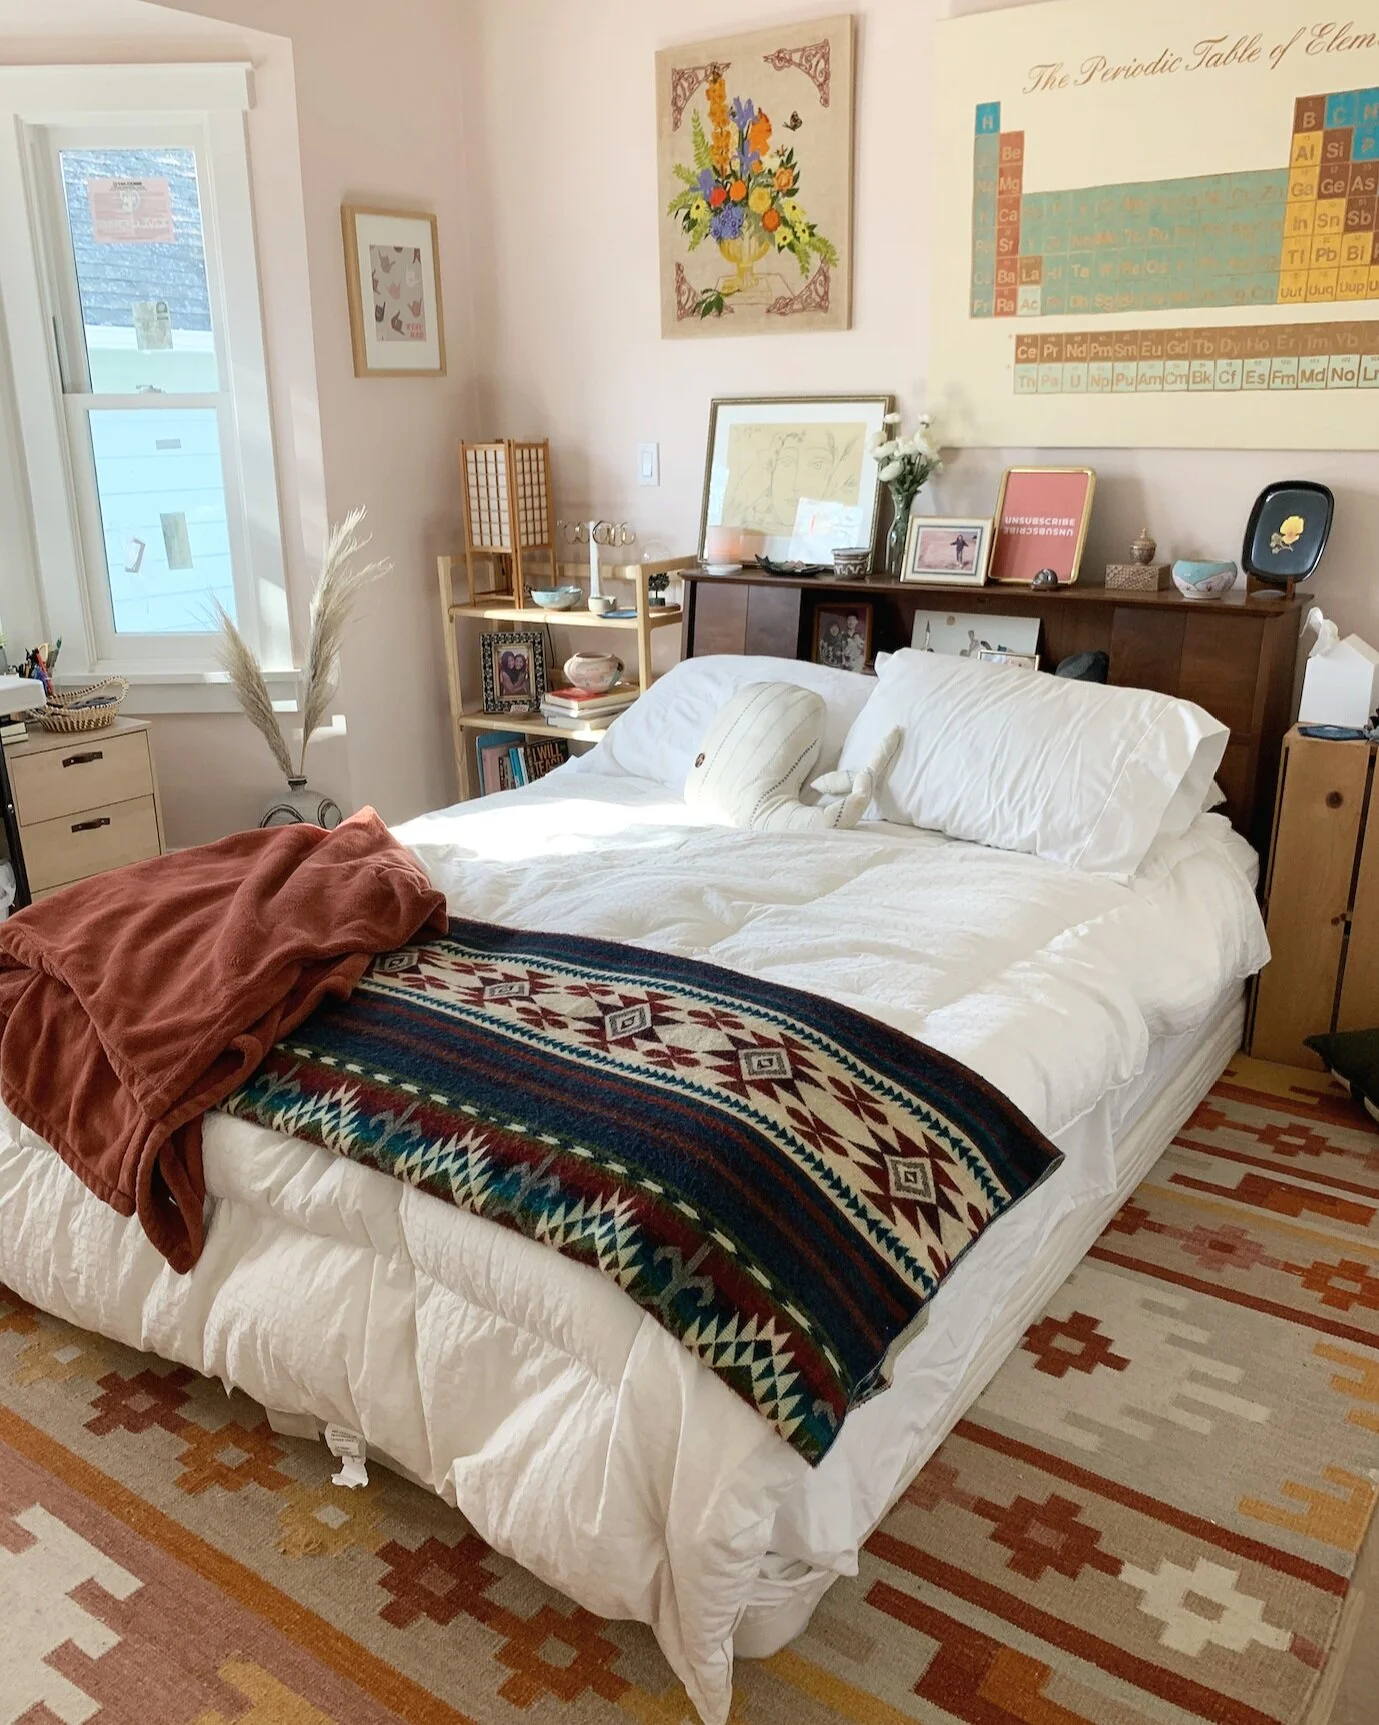
Welcome to my room! As you can see, it's very much a work in progress. The window treatment is still cheap paper blinds that we have taped up with blue tape. I know minimalism is super almost trendy right now. I wouldn't necessarily identify myself as a minimalist. The minimalist aesthetic is so sterile and impersonal to me and and when you walk into this room, I want you to feel warm and welcome and cozy, like you're living in a home. For me bare floors and walls is not my vibe. I'm a lot more like, “Come into my space let's all hang out and flop on the bed.” 

My room I would say is more...what would you call this? I don't know. Everything in here is stuff that I really love and I enjoy looking at everyday. As you can tell my colors are very warm and welcoming and soft and feminine. I would say I'm a very feminine decorator, as is my brand and everything. 

1. DIY a GIANT Canvas

The first thing I wanted to talk about that gives your room major vibes on a budget is this piece of art. I have a giant periodic table on a huge canvas and this is something that I made myself. I went to Michael's which is a craft store that always has coupons and their canvases are always on sale. This was the cheapest, most giant canvas. I believe it was something like $15, maybe $20 now, because I painted this years ago. 

My favorite DIY Youtuber is Kiva Brent and she does an amazing job of showing you how to do a simple DIY canvas with abstract shapes for super cheap and looks artful and tasteful. She's so talented and you can create art yourself that makes a huge statement.

Having a giant canvas is a truly statement piece that sets the vibe and tone for your room. My periodic table was going for a chic nerd vibe haha. But  you don't need to create as intricate an artwork as the periodic table of elements. That's a lot I wouldn't even do it again. It was so hard to do, but I'm very proud of how it turned out.

You can do simple abstract shapes and this artwork can be super unique and personal to your space and also doesn't have to cost that much. It's really no more than $30 dollars but makes a huge difference in this space. It totally sets the vibe.

2. Decorate from nature for FREE

Something that brings nature and warmth and more organic-ness to a space is plants. I do not have a green thumb. I can't keep things alive, so what I really love is dried out pieces of grass or leaves and branches. Pampas grass is trendy right now. It's also an invasive species, so I wouldn't go planting them. But if you do happen to find some already planted, I found these on the ground and picked them up. I sprayed them with hairspray so they wouldn’t shed everywhere and plopped it in a vase that I already had.

Finding decoration doesn't have to be expensive. It can be free branches that you pick up off the ground. It can be a pinecones you put in a bowl that you forage. It doesn't need to be anything fancy, but bringing the outside in gives this organic nature. That's what I really love bringing into a space—an element of outdoors in.

3. Swap your handles for an easy, elegant upgrade 

A super easy upgrade is swapping out handles on cabinets and furniture. These are affordable brass ones from Amazon but they make the cabinets and drawers so much more chic. These are the exact ones that I have. I got 5 pulls for $18 and a 10-pack of single knobs for $23—basically $40.

The brass ties into the gold elements I have in my room. My mom originally wanted silver handles, but since these are very cheap and affordable, she can easily swap them out whenever I move out of this room. I'm not staying in here forever, y'all! Swapping out your handles for something from Amazon that's very affordable really makes an elegant statement to your space.

4. Shop for big furniture on Facebook Marketplace and at thrift shops

One of my favorite places to shop is Facebook Marketplace. The thing that I love about Facebook Marketplace is your ability to input search terms and have notifications pop up when you have a new listing that meets your criteria. For example, I am looking for two night stands. I don't have night stands right now that match and I would love to get a set of nightstands. However, I am only willing to drive and pick up in a 40 mile radius for under $200. I'll get notifications for a pair of nightstands whenever a new listing pops up that matches that radius and price range. Then I will take a look at it and decide if I want it. None of them have worked out, but I'm not married to a certain style. I'm open to seeing whatever the universe sends me.

I will eventually find a pair of nightstands. The thing about decorating a room and trying to find everything on a budget is that you have to be a little bit flexible.  The time and the price and the style you can't be married to.

Another thing that is really great to find on Facebook Marketplace and through other second-hand apps like Offer Up or Nextdoor is IKEA furniture. Everybody buys IKEA furniture! I would almost never ever buy IKEA furniture from IKEA unless I were really in a pinch because the thing is you and everybody else have all shopped at IKEA. I'm sure 90% of people who are watching this video have shopped at IKEA, which also means at the end of the day you've probably gotten rid of some IKEA furniture. 

If someone is moving cross-country, it's not worth taking it and they try to get rid of it for cheap. So you always can find IKEA furniture on the market. If you do want a specific IKEA style, you could probably put the name of that in and have it populate and you would probably get what you wanted. Facebook Marketplace is the bomb.com. 

This headboard is actually from Facebook Marketplace. I got it for $80. What I love about this headboard is that it also provides more storage for all my little knick knacks. A lot of these little knick knacks are inherited from my parents or grandma or great aunt and uncles. I really don't go seeking out tchotchkes they find me. They're all very sentimental for one reason or another. This headboard has very mid-century modern vibes but also is very functional.

Another great place to get super great quality furniture, is to shop at your local thrift shop. I always try and go into those places without a specific thing in mind. You'll end up finding randomly really great stuff. This rug I got from Jewish Thrift Council. I went in on a whim after I got a haircut one day and I saw this rug and it was price marked for $200. If you try to find kilim rugs like this, they easily go for $900+. It's handmade and I loved the colors. It was so perfect, so warm. It definitely gave me southwest vibes. I wasn't looking for this rug but this rug definitely found me. A rug truly transforms the space—a giant canvas and rugs.

5. Discover affordable art on Etsy

Another way to get super affordable art for your room is through Etsy. This “Unsubscribe” print is actually a digital piece from my own Etsy shop and you can download it and print as many as you want. What I do is get a frame from a place like Goodwill or The Dollar Store or Target and fill it with artwork that keeps me motivated on my FIRE journey. 

Yes, I'm plugging my own two pieces of artwork, which I obviously really love and I find super inspiring on my journey to financial independence. They remind me to “Stay Radical” because it's absolutely radical to be retiring at 35 and to “Unsubscribe” from not only marketing emails, but also from ideas and people who bring you down. 

I obviously love my own artwork and you can check me out at Millennial Money Honey Etsy shop. if you're watching this I have a discount code for “MMH20” to get 20% off everything, but there are so many other talented artists out there on Etsy selling their prints at a very affordable price.

So those are the 5 easy swaps I did to make my room feel my own. They are super frugal and you can easily use these tips to furnish your own space. That is how I designed my bedroom. Thanks for coming to my room and I will talk to you guys soon! 

If you liked what you saw and you were inspired to decorate your own space, please smash the like button, subscribe to my channel or to the podcast, and we'll talk more money, honey!


Disclosure: Some links are affiliate links, meaning, at no additional cost to you, I may earn some compensation. All opinions are 100% my own! I truly appreciate you and your support. :)

Room Tour.jpg

Sustainability Starter Pack: 6 Simple Swaps to Save Money (and the Planet!)

Sometimes being sustainable feels like a hard ask. I get it! That’s why I wanted to share with you the 6 easiest, most mindless swaps that help save you money and help save the environment.

1. Reusable Water Bottle

If you’re looking where to start, look no further than the humble reusable water bottle. Not only does it reduce plastic water bottle usage, which takes years to biodegrade, but it also is chic and cute. I like water bottles that are super great at insulating the cold! Mine keeps ice in there for over 24 hours.

Hydroflasks are a very popular, and trendy option, but there are also great options on the market that do the same job for less. I personally use a TAL 64 oz bottle. (Be sure to use Rakuten with it to get 6% cash back!) This way I know I only need to drink one bottle of water per day and I can tell if I’m not on track!

Stay hydrated, save money, and the planet. WIN-WIN-WIN! :)

2. Fountain Pen

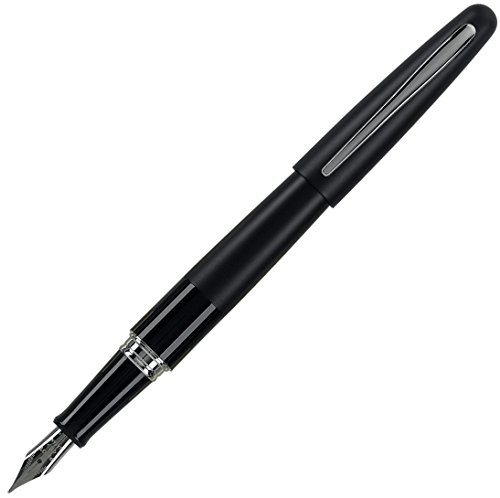
Sustainability but make it fashun! This year I started using a refillable fountain pen. I use a Pilot Metropolitan. When I did my research, this was a good, basic, beginners fountain pen. I needed something easy.

My dad actually started using them years ago because the pressure it takes to write with the fountain is a lot less than the grip you need with a standard pen. He ended up switching to fountain pens for that reason, but I was more interested in the sustainability and sexiness factor. This is a sexy pen! It’s heavy and the nib looks very fancy. There are really fancy ones you can get on Amazon for like $12, so it doesn’t even cost that much to get started.

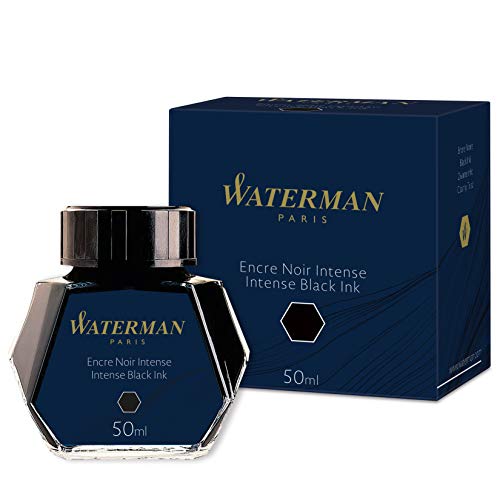
This one came with a fountain pen and an ink refill cartridge. You’ll take an ink cartridge, put the end into the inkwell, and squeeze the rubber part until the ink stops bubbling. That’s when you know it’s full of ink. Then you unscrew your fountain pen and load the ink cartridge in. It’s super simple once you get the hang of it.

Pilot Metropolitan: $23 at time of publishing

It’s also ergonomic and you don’t have to put a ton of pressure on the paper when you write which causes your hand to get cramped up and callous. It saves you a ton of money and makes you more conscious of keeping track of your pen. This is the only pen I use now. It’s made of all metal, no plastic like those cheap pens you buy.

I really love using this fountain pen. It feels luxe and not only does it make you feel luxe, it saves you a lot of money from ever having to buy another pen again. Again, I use a Pilot Metropolitan, a great beginners fountain pen, but I highly recommend you check out any reusable fountain pen.

Pen: $14.99 // Ink: $11.29 at time of publishing

3. Wool Dryer Balls

Another super easy swap is getting dry balls. I like the wool one’s because they’re all natural and non-damaging. The dryer balls cut down your drying time, the natural motion from the balls bouncing around in the machine helps to beat the water out even quicker and keeps all of your clothes feeling really soft without having to use dryer sheets. Which even knows what’s in those dryer sheets—I don’t.

I really like using these dryer balls in place of dryer sheets. They keep my clothes soft, cut down on the drying time, and I’m not buying dryer sheets ever again.

$6.99 for pack of 6 at time of publishing.

4. Safety Razor

Honestly, I can’t think of a reason not to switch to safety razors. In addition, to giving a better shave and reducing irritation, they are less expensive and more eco-friendly than normal razors. Seriously, what more could you ask for? One handle will last a lifetime, and the blades (which come in bulk!) can be recycled at your local recycling center.

I specifically like a butterfly safety razor because it’s easy to twist open and replace the blade. It goes right on top and that’s the only thing you are really replacing. For a pack of 100 blades it cost about $6-$7. Traditional razor-heads for women are really expensive and add up so quickly. So for a pack of 100 of these razor blades you could change it out every couple days and you’d be gold in for the entire year.

Vikings Blade Chieftain: $29 at time of publishing.

I will say, it takes a little bit of a learning curve. And something that I miss about Traditional razors is the pivoting head that gets inside all the curves and your curvy lady parts. Razors were designed by men for men way back when to shave their beards and that area is easier to get to. So it takes a bit of an adjustment getting used to the weightiness of a safety razor and the feeling of a single blade. 

A modern woman’s razor has like three or four blades. This one only has a single blade, so that way it’s not cutting so close to your skin. When you have that many blades, it cuts the hair below the skin, which is how a lot of people get razor burn and ingrown hairs. This is actually something my dad turned me onto because he was getting a lot of ingrown hairs and I do too under my armpits. The switch to a safety razor has helped a lot with that.

Safety Razor: $16.98 // Razor Blades: $14.97 for pack of 50 at time of publishing.

Something I am interested in trying out is a Leaf Razor ($84 at time of publishing). It has a lot of the same properties of a single blade safety razor, but they modernized the design to have a pivoting head. It’s also made of metal, plastic-free, and you use single blades. You can put in a single blade, or it can hold up to three which is nice to have that option.

The Leaf Razor is more of an investment, but a beginner safety razor will run you about anywhere from $15-$30. It’s a worthwhile investment sheerly from not having to place your razor head over and over again.

5. Shopping Bags

Living in California we actually have a plastic bag ban. That means whenever you go to the grocery store they will charge you $0.10 if you don’t bring your own bag to reuse. Obviously it’s a financial incentive for people to bring their own reusable bags.

I keep like 5-10 bags (probably an excessive amount) in my trunk just so that they are always handy even if I bring some in and forget to put them back. That way I’m ready to go and can pull it out when I’m ready to do my grocery shopping. It’s really very low effort to remember to bring your own bags. At this point it’s a habit.

My favorite ones are the standard size Baggu bags. They come in a ton of fun prints! I have a shark one, a llama one and one of my favorites is one that’s made to look like a classic plastic one.  Since I am a designer I really like bags that are cute and aesthetically pleasing and not only that but they’re super, super functional.

3-Pack: $36 // Single Bag: $12 at time of publishing.

If you’re going to be sustainable, you want to make it fun and have the things you use spark joy whenever you go to use your bags. It sparks joy when I’m packing my groceries up. 

These can carry like 3 gallons of milk and it will still hold up. I only need two or three per grocery trip, but the sides expand. There’s extra space on the sides so you can hold a lot of stuff in this bag. I love my Baggu bags. They’re super functional and practical. They fold up into these nice little pouches. I think they are about $12-$16 and they have new prints every year.

I really like to give these as stocking stuffers or a white elephant gift because I’m so practical. I'm like well this is totally something anyone can use even if they aren’t as eco-chic as you. Everybody could use a large nylon tote, right? I have been known to even steal these back at my own white elephant parties. Not gonna lie, I brought as my gift and definitely stole it back. So think about that for your next white elephant party, if you have any this year…although who’s having white elephant or Christmas parties this year. *WOMP*

6. Rechargeable Batteries

This is not as fun as my reusable bags, but this product is something I use all the time. It runs many of the little appliances in my life and it’s so behind the scenes but it’s always good to have these on hand and that is rechargeable batteries.

Whenever I have a little appliance, like the clock on my wall, and the batteries die, I replace it with a rechargeable battery–my coffee foamer, all of my flashlights I use for camping, literally any little thing that uses batteries. It’s just a matter of having enough extras on hand so I can recharge them. Usually things don’t run out at the exact same time so I have maybe four on hand that I can use as my reserve.

Rechargeable Batteries + Charger: $14.97 for pack of 50 at time of publishing.

I got a rechargeable battery set a couple years ago and it’s really great. The charger I have is for AA batteries and it can also charge AAA batteries. Rechargeable batteries are the way to go. Batteries themselves are so expensive and if you find yourself running out of them a lot it really adds up. Not only does it add up monetarily but batteries aren’t great for the environment, so it’s great to have these rechargeable ones.

Just like your phone, the batteries degrade overtime. Eventually you would want to replace them, but for the years and amount of use I get out of these, these are SO worth it.

There are so many ways to help preserve the environment that don’t require you to completely change your lifestyle. I’ve found that starting with small, easy swaps has led to me making more and more sustainable choices. The impact on my day-to-day life is barely noticeable, and it saves me money in the long run! We only have one Earth to live on, which means it’s so important that we take care of it. Have you made any simple sustainable swaps recently? Share your eco-friendly hacks in the comments below!

Save your money. Save the planet.


Disclosure: Some links on my site are affiliate links, meaning, at no additional cost to you, I may earn some compensation. All opinions are 100% my own! I truly appreciate you and your support. :)

Sustainable Swaps

How to Stop Shopping: My Experience and Tips for a Successful No Spend Year

I didn't buy anything for a whole entire year. You read that right. I did not buy any clothes, any home goods, any candles, decor, nothing–no physical item for an entire year. This year really helped shape how I think about my spending—what I really need versus what I want.

It all started back in 2017, which was my year of sustainability. It was my new year's resolution to be mindful of my impact on the environment and reduce my impact where I could. But instead of doing it for an entire year, which I felt like was a lot for me to cut things out of my life, my plan was to do it for a quarter, so three months at time and have four different resolutions. For the first quarter, I decided to not buy anything. 

These were my rules for not buying anything:

1. No Clothes

My first rule was not buying any clothes, period. No clothes. I did not need anything–no dresses, no pants, no hair accessories. I could make everything that I had in my closet work. 

2. No Home Goods

The second was I could not buy any home goods. I have been known to go all out on Christmas decorations, Halloween decorations, seasonal flair. Tchotchkes to make your home look cute with whatever was the trend at the time...probably chevron or something. So I could not buy any home goods or candles or anything like that. 

3. No Makeup/Skincare

I could also not buy makeup or skincare. So if I saw a bright red lipstick that supposedly looks good on every lip according to that one blogger I wasn't allowed to buy it. I had to use all of the things that I had.

4. Can buy Necessities I run out of

The things that I could buy were stuff that I ran out of like shampoo. If I ran out of shampoo obviously I'm not going to not wash my hair for the rest of the three months. I was allowed to buy things like that.

5. Can buy Experiences

I could also buy experiences, whether that was dinner out with my friends or a night out on the town. My friends and I  would always go out and I would never not want to experience making memories with my friends. So experiences—travel, food, things like that, I really did not hold back on. Only materialistic items experiences were off limits. 

The first few months…

So the first few months were really hard, I'm not gonna lie. I have always been a person who really loved to dress up, to be trendy. My clothes have always felt like a form of self-expression. Even when I was growing up in a small town in Texas, I always tried to wear what was cool or be ahead of the times. Back when skinny jeans weren't really a thing, I would wear them. I wanted to be trendy and cool. That's how I defined myself, so it manifested itself in shopping and I felt the need to be accepted by wearing what was “cool.” I used to define myself self-worth through clothes and because of that the first month and a half or so was honestly really freaking hard for me. I'm not gonna lie, it wasn't easy, it was like going through withdrawals.

Sometimes you just wanna mindlessly scroll through Zara and online shop. A favorite pastime of mine is literally going to a mall and wandering through every single store and seeing what I was gonna find that day. I could spend seven to eight hours at a mall, no joke, me and my mom all day. It was a marathon! Shopping was my exercise. So it was hard. I would still go to the mall with my friends because that's kind of a bonding experience in and of itself. (I know these days during the pandemic we don't even go to malls really anymore or hang out with friends, but it was such a bonding experience at the time.) 

I told myself at the end of those three months I could buy whatever. So if I really wanted that shirt, that top, that dress I could buy it. So for me, it was very hard. But after about a month and a half I lost the overwhelming desire and urge to buy and because of that it really made me reflect on all of my purchases. Do I really want it? Do I need it? What will it replace in my closet? Or do I have anything like it?

All of my wants became a lot more conscious and front of mind. So at the end of the three months, when it ultimately came down to it, I had things that I wanted initially and I didn't want them anymore. Even in that period after when I said I could buy anything, I didn't buy anything for the next three months. I loved the experience so much. Instead of adding something you have to remember, by not shopping at all it's much easier to take something out than it is to add something in. So it was easy in that sense. The third quarter of the year I actually did another three months of no buy.

Transitioning to A year

Because I did the no buy Q1/Q3 in 2017 I decided I was going to go the full year in 2018. Even my closest friends were like, “No way, Catie, you can't do that. There's no way you're gonna make it a whole entire year.” Everybody knew how much I loved to shop and they didn't think I could last a whole year. But I knew that because I had gotten over the urge to shop and I was a lot more mindful, I was able to roll those skills into a whole ’nother year. It was not honestly as hard as one might think.

I still kept the same 5 rules that I did for my initial quarter of no spending, so no materialistic items, only experiences. Because of that, I didn't feel like I was missing out on anything. Things are things and at the end of the day nobody's going to remember what you were wearing two years ago. You're going to remember the things that you did, the trips that you went on, the nights you had, and the memories you made.

That mentality came into focus for me in the year of 2018 when I didn't buy anything. You're not going to remember that lavender candle, you really won't. It might smell nice at that moment, but you don't need it. You're not going to be thinking about that candle you were sitting there sniffing. No, it just doesn't work like that...life doesn't work like that. 

Keys 🔑 to success

A key to my success of the year was going in and testing it out for a quarter. During the year I wore the same clothes over and over and over again. Honestly, I don't think anybody even noticed. Before the no spend year, I was defining my worth by the cute outfits I was wearing, but I don't feel that anybody noticed. I was wearing the same clothes over and over again and they still thought, “Catie, you look good. You still are a stylish person.” It made me realize that buying the latest fast fashion does not make you any cooler.

People will still like you and they won't notice if you're not wearing the latest and greatest fashion or the designer labels or anything like that. I used to want a Chanel bag, but things like that did not matter to me anymore and they still don't. If I need a trusty old bag I will wear my leather Madewell one that I've had for the last five years and it still feels timeless. 

The way I made it through the whole year without feeling the need to buy but still keeping my wardrobe fresh or “new” to me was by reaching out to my network. The very first thing I did in January was organize a clothing swap. I invited all of my friends to my backyard and said bring clothes, bring what you would donate. I had everything organized and hung up everybody's clothing. Then people could take whatever they wanted for free. People would come with their old clothes, hang them up, and then take whatever they wanted. At the end of the clothing swap I donated everything that didn't get exchanged. People felt like they got new clothes. I got some cute new tops for free and saved a lot of money and then donated to people who really needed the clothes.

I did the clothing swap and then I tapped into my network of friends and family who were getting rid of stuff. By sharing with everybody my goals and what I was trying to do (not buying anything for the year), friends and family would offer clothes to me. I have three sisters and we're close enough to the same size, so if they were getting rid of stuff, I'd ask them to save stuff for me. Whenever I would see them they'd have clothes that they didn't want and I would pick through them and get “new to me” clothes. 

Same with my grandma. I wear a ton of my grandma's clothes and even my aunts and uncles. I wear dude's clothes too, anything is fair game. I will take whatever people don't want and try and give it a new life, a new home. That helps me curb my want to buy new things for the sake of buying new things. I still feel like I'm getting to experience a new wardrobe every time I get a new piece of clothes.

Fashion (And Mindset) Evolution

My style has definitely shifted. In 2020 big puffy sleeves, the squared off neckline or things like that are very in vogue right now. I probably dress more like a grandma because I literally have clothes from my grandma. Even though I do wear old lady clothes and my uncle's men's clothes, my dad's clothes, whoever it is, I try to stick to pieces that are timeless. My color palette has definitely ranged down too. I used to wear brighter, bolder colors and now everything tends to be in a very navy, white, black, gray,—a neutral palette. Those colors stand the test of time. A bright yellow will come and go. A bold marine blue will be in trend for a season, but neutrals are timeless.

My Takeaways 2 years later…

It's been almost two years since I actually did my no buy challenge. The thing that has stuck with me is that I literally do not have a desire to buy new things. My sister asked me today if I wanted to buy anything to add to her order and I was like nah, I'm good. I know lounge sets are so popular right now, but I also have so much clothes. That’s the thing, I still have a lot of clothes.

I'm totally and perfectly happy with what I have now.  I did buy one thing this year and that is my biker shorts because that's a big trend right now too and I've been thinking about that purchase for a year. So finally back in April I was like, I'm gonna buy these biker shorts. We're staying at home and I want comfy pants, so I'm gonna buy these biker shorts and I did. That was the one thing I bought this year. A lot of the things that I buy, I try to buy secondhand or thrift it. 

If I do buy new stuff, it’s from companies that I believe in their mission and who I believe care about like the world and the kind of world that we are shaping for our children. At the end of the day I feel like consumerism wants you to buy, buy, buy, and that creates a lot of waste. I'm not trying to get all environmental, but I do care about that and that's what is important to me. I don't try and push that belief on anybody else, but I'm trying to do what I can to do my part. 

My no buy year was really amazing. It helped save a lot of money for me, helped do a little bit of good for the environment, and it was just an all-around great experience. I totally recommend you try it, whether it's for a week, or a couple months, or a quarter ldid initially, or a whole entire year. If you've tried it, let me know how it went. And if you have any more tips on how you did it, also leave that in the comments below.

If you liked this video and you want more content like this, like the video and subscribe and I'll see you next week to talk more money honey.


Disclosure: Some links are affiliate links, meaning, at no additional cost to you, I may earn some compensation. All opinions are 100% my own! I truly appreciate you and your support. :)

NoSpend.jpg

Save Money with a DIY At-Home Quarantine Haircut

Transcript:

Hey guys! Welcome back to Millennial Money Honey. Today, I’m going to give myself an at-home quarantine haircut.

Back in February, I decided I'd had it with hair salons. I would no longer be paying the amount that I paid to get my hair done in Los Angeles. I would spend $200+ every single time I went into a salon and that would be only for a haircut...plus tip or for a perm, it would be way more. I also did balayage for awhile and then I even upgraded that and was doing a full bleach blonde. Because of that my bill would run anywhere from $200 to upwards of $500+.

I decided to do an at-home haircut and it went horribly and I ended up back at Supercuts the next day. I decided $30 is worth it to pay for a haircut, so that's where I landed on the matter. I didn't even end up making a video because it was so bad, so I'm kind of nervous to actually try this again. 

My sister has convinced me that since we are on month nine of lockdown, it's time for me to get a haircut. As you can see my strands are very ragged and dry. You can't feel it through the camera, but I'm telling you, it feels like straw. So that being said, I'm really excited to get a new fresh look for winter. Let's chop this hair! 

Today I have my sister, Sarah, here to help me with my haircut. 

SARAH: Hey guys! I’m Catie’s sister, Sarah.

CATIE: She is by no means a hair stylist or barber, but she has been picking up a lot of quarantine hobbies. Everything from sourdough baking to becoming a plant mom and she's a puzzle queen. She’s done all the classic quarantine hobbies including cutting hair. Let's do this!

What tools do we need for this? 

SARAH: We have a spray bottle to wet the hair down, a comb with a rat tail, and then hair cutting scissors. Oh and we have a lot of clippies and rubber bands. [We used regular ones, but recommend using these little clear rubber bands.]

CATIE: I think they know what clips and rubber bands look like.

SARAH: Okay let's start by spraying your hair down and then we also need to decide how much you want to take off.

CATIE: I'm trying to grow my hair out actually, so I don't want to cut off too much. I feel like it's better to go shorter because inevitably this is going to be uneven.

SARAH: Wow, not a lot of faith here. 

CATIE: I think like only maybe like an inch and a half. Is that too little?

SARAH: No, you can do as much or as little as you want.

CATIE: Okay yeah, let's start with an inch and a half.

SARAH: I'm going to start by dividing your hair into two sections. And this is how you normally put your hair, right?

CATIE: Yeah, I have a center part.

SARAH: I put in a rubber band and then we're gonna position it where you want to cut it. Unfortunately, we don't have like the tiny rubber bands, which I think would be better for this. 

CATIE: Not prepared.

SARAH: The goal is to brush it straight down and then have it rubber band exactly where we want to cut it and we're going to try and keep it as even as possible. 

I know you guys can't feel it, but I can feel it when I brush your ends how dead they are...knotty. 

CATIE: Yeah, honestly that's the problem. After I bleach dyed my hair blonde four times it just killed my hair. It feels horrible. It honestly feels like straw and I didn't even know hair could feel like straw because my hair has never been that damaged before. That's what made me decide to not bleach my hair anymore. I'm going back to my virgin hair and that's the goal with growing it out.

So we're parting my hair into little sections and tying with rubber bands all the way around my head. We watched a lot of Youtube videos where they did two ponytails or a single ponytail and then cut it, but Sarah found this one that she wanted to try. The new thing to do is section your hair off into little ponytails and then cut those all the way around. We’re Youtube experts. 

SARAH: Catie will link the Youtube video that's the inspiration for this haircut, but one thing that I loved is that he's a hairdresser and he was super candid about like if you actually want a really great haircut you need to go to a salon. 

CATIE: That's what I said!

SARAH: But if you're gonna try it at home, this is what you should do to make it look not terrible.

CATIE: Wowwww.

SARAH: Ready? First cut, here we go!

Basically I'm doing point cutting into the hair at each of the guides. I don't want that blunt cut because I think that's where it becomes obvious that I'm not a professional hairstylist. I'm going for more of a feathered look on the end that doesn't make it super obvious if I'm not perfectly aligned.

CATIE: So she cut all the sections and now we're taking them out and hoping, praying, that this is even.

Are we done yet? 

SARAH: Okay, and we're done!

CATIE: Feels lighter. I feel like you got a lot of the dead ends off. You can still see a tiny bit but definitely less than before. Feels lighter and shorter. Let’s blow dry it and see see how it is.

SARAH: Sounds good!

CATIE: Alright, so not bad, right? It actually looks pretty decent. I was very skeptical going into this and I actually kind of like it. I would definitely let her cut my hair again. So thanks, Sarah! 

Lessons we learned—when we dried everything out, the front ends ended up being a tiny bit, maybe half an inch, shorter. So it kind of like goes up a little bit in front, which is okay because some people like a little face frame, but I would definitely keep it a little bit longer if I were to redo this again. And then we cut it wet, but I think we would try doing it dry. When we section it off in the beginning I’d do it from dry hair because you get the more natural texture. 

Those are the two tips we would recommend doing if we were to do it again, but overall I think it turned out really great. I am now a believer in a do-it-yourself at-home haircut—my previous experience has been redeemed. I would recommend it if you have a friend to help. I don't know if I'd be able to do it myself, but I know Sherry from @saverspender does. 

Let me guys know what you honestly think about my haircut. I know it doesn't look like a huge difference, but it's definitely shorter, a little bit lighter, and you can't feel this, but my straw ends are almost gone. I just have a little bit in the front. 

If you check out my hair from the back you can see that it is all my natural hair. I've completely cut out the dyed end part. It's looking so much better and it feels so much better. I'll link the video tutorial that we actually followed to cut my hair. If you guys have any feedback let me know your honest thoughts on cutting your hair at home and how you think my hair turned out and if you have any tips I would love to hear them because I know i'll be doing this again in the future.

If you enjoyed this video, hit the like button and if you want to see more videos like this subscribe to my channel and hit the notification bell so you get notified when I drop the next video. Stay tuned for next week and we'll talk more money honey!


Disclosure: Some links are affiliate links, meaning, at no additional cost to you, I may earn some compensation. All opinions are 100% my own! I truly appreciate you and your support. :)

Haircut_Pinterest.jpg

My Minimalist Daily Makeup Routine

Good morning! Today I wanted to share with you my three minute minimalist daily makeup routine. Now I know that might seem like a little bit of a departure from true financial talk but it's actually all pretty related.

Makeup itself is really expensive so you know by paring it down my makeup routine to 7 items that I use on a daily basis it has really saved a lot of money and not only has it saved a lot of money, it's also saved me like a lot of time, which time is money. It's all related.

1. Moisturizer

I always start with a moisturizer. I use Muji's moisture milk, but I know Muji is closing down in the US due to the COVID situation, so any morning moisturizer will work. I've also used Cerave PM—thirsty skin, thirsty girl. You know how it is. II just pat it in and let it absorb for a couple seconds. 

2. Sunscreen

The next product I use is sunscreen and it doesn't really matter what sunscreen you use. I like Biore Aqua Rich UV. It's a Japanese sunscreen, but I got it on Amazon. It is the best! It absorbs into your skin it doesn't feel sticky or oily. You can always count on a good Japanese sunscreen product. I rub it into my neck. Don't forget your ears! You don't want those wrinkles. 

3. Concealer

Next up, we have a concealer. I use the Cle de Peau Beaute Concealer in Ochre. I like it because it also has sunscreen in it. I put it underneath my eyes to brighten everything up and then on any like problem spots I may have. Then I dab it in and put it on my lids too to even out everything. Already looking way more alive!

4. Eye/Lip Tint

Next I use Milk balm-stain in Werk. It's good for eyes, lips, cheeks, so I just put it on my cheeks to give me some color. I like that it's not a powder because I prefer a good, dewy, moist look. I put it on my eyes too to give it a little bit of color without full makeup and that's that.

5. Highlighter

Then I take my highlighter, I use Tarte's Pro Glow To-Go palette that my sister gave me that she wasn't using. I think you can use any highlighter and any products you already have for these like makeup things. You don't need to go out and like to buy new products. So put it on my cheekbones to get that glow going. 

I’ve also used and loved Clinique’s chubby highlighter stick. It is a really super easy swipe on and very creamy. I honestly preferred it over the Glossier highlighter stick—it was a lot harder and less smooth.

6. Brows

The sixth product I use is a brow pencil, but anything that would define your brow is good. I sometimes use a dark eyeshadow or I have Colourpop's brow gel. I've had a Shiseido brow pencil (deep brown color) for literally years at this point years—maybe four years. This thing never runs out, although it is on its last legs. I think defining the brow really fills out your face and defines your face. I try not to go too dark everyday, just pencil it in. 

7. Lips

Then finally I have this Revlon Color Balm Lip Stain in Smitten. I like a bright pop of color because that really distracts from any imperfections and really makes you look awake. This is a lip stain and balm, so it goes on really moist and even when it comes off, the stain stays on. The color lasts forever. Even as it comes off, your lips stay a deep reddish pink. 

That's it! So fast, saves time, saves money. It took me a while to be confident in my own skin. I used to have to wear a full face of makeup to go out, but it is so quick I'm out the door in three minutes. You get to sleep in more and again I can't emphasize enough you can just use what you already have. I'm sure some of you have some semblance of these types of products. You don't need to go buy new things. Feel cute, fun, and pretty. Get ready to take on the day! Let's go get that money, honeys!

ProDUcts i use

1. Moisturizer - Muji High Moisture Milk

2. Sunscreen - Biore Aqua Rich Watery Essence SPF 50+

3. Concealer - Cle de Peau in Ochre

4. Cheek tint - Milk Makeup in Werk

5. Brow pencil - Shiseido Brow Pencil in Deep Brown

6. Highlighter - Tarte Pro Glow Palette

7. Lip - Revlon Lip Balm in Smitten


Disclosure: Some links are affiliate links, meaning, at no additional cost to you, I may earn some compensation. All opinions are 100% my own! I truly appreciate you and your support. :)

2_Makeup_Pinterest.jpg