7 Bougie on a Budget Gift Ideas

Disclosure: Some links on my site are affiliate links, meaning, at no additional cost to you, I may earn some compensation. All opinions are 100% my own! I truly appreciate you and your support. :)

It’s always good to have a handy store of ideas for last minute gifts. Inspired by my own wishlist and things I love to give to friends, here are 7 gifts that are perfect for your bestie (or yourself) that won’t break the bank.
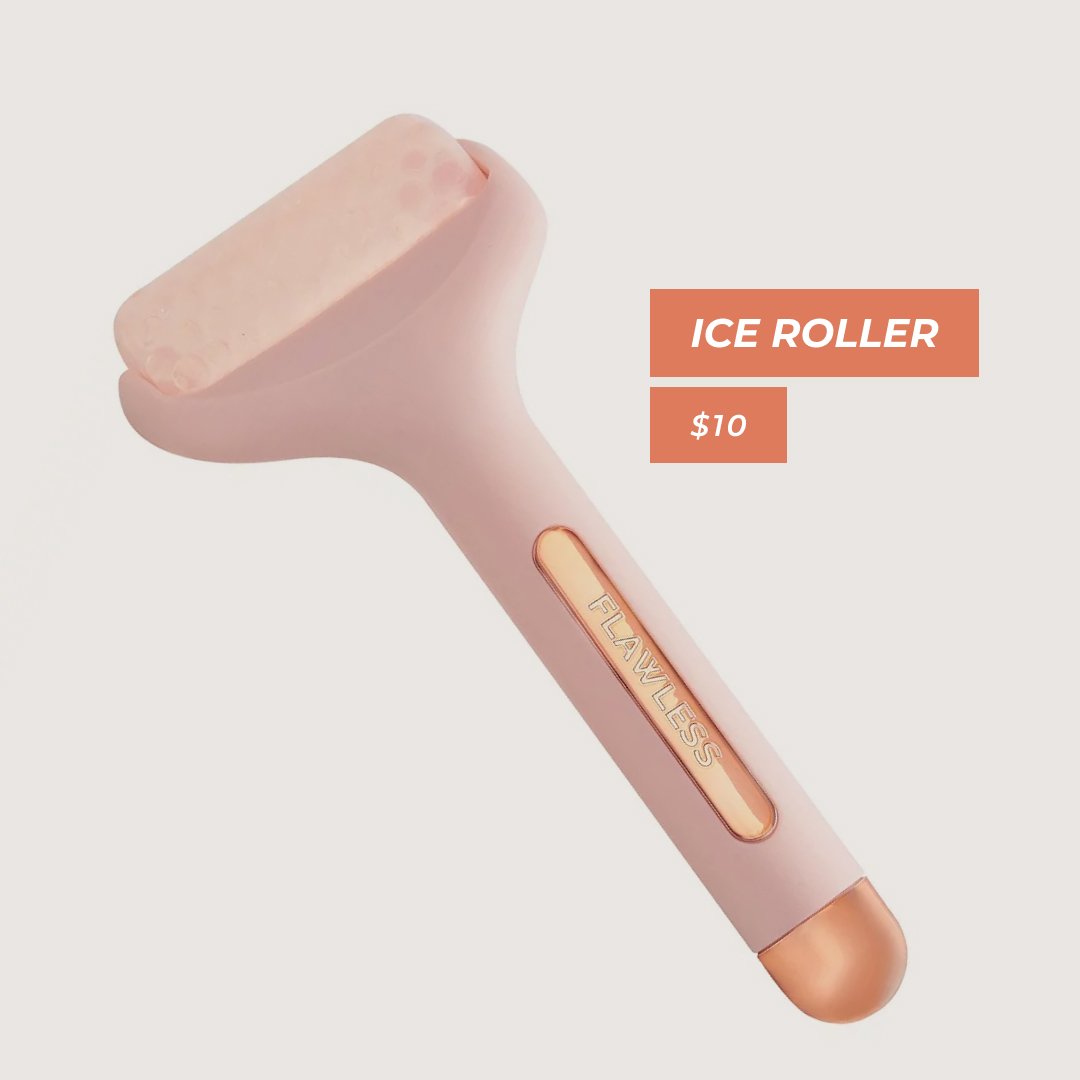
1. Ice Roller

Get your girl a chic ice roller, that gives me Skinny Confidential ice roller vibes, but for a not Skinny Confidential price. I’m not sure I could ever justify a $70 ice roller —wild! This is the perfect way to feel de-puffed and luxurious in the morning!

Flawless Finish Ice Roller: $9.98 at time of publishing

2. Finance books

Financial wellness is super sexy! That’s why it makes the perfect gift whether they are just starting out their personal finance journey or if they’ve already got it down.

My girl Alyssa of Mixed Up Money is releasing her second book, Financial First Aid, for helping people become more confident with money.

And Nick Maggiulli from the blog Of Dollars & Data is releasing his first book, Just Keep Buying, to help people save and grow wealthy.

They’re both available for pre-order right now and I’m hoping Santa gets me these for Christmas!

Financial First Aid: $18 // Just Keep Buying: $19 at time of publishing

3. Dossier Perfume

Dossier perfume is perfect for your friend who loves trying new expensive fragrances, but you don’t have the budget to spend hundreds of dollars on designer perfumes. All of their perfumes are under $60!!

Dossier Perfumes: $29-$59 at time of publishing.

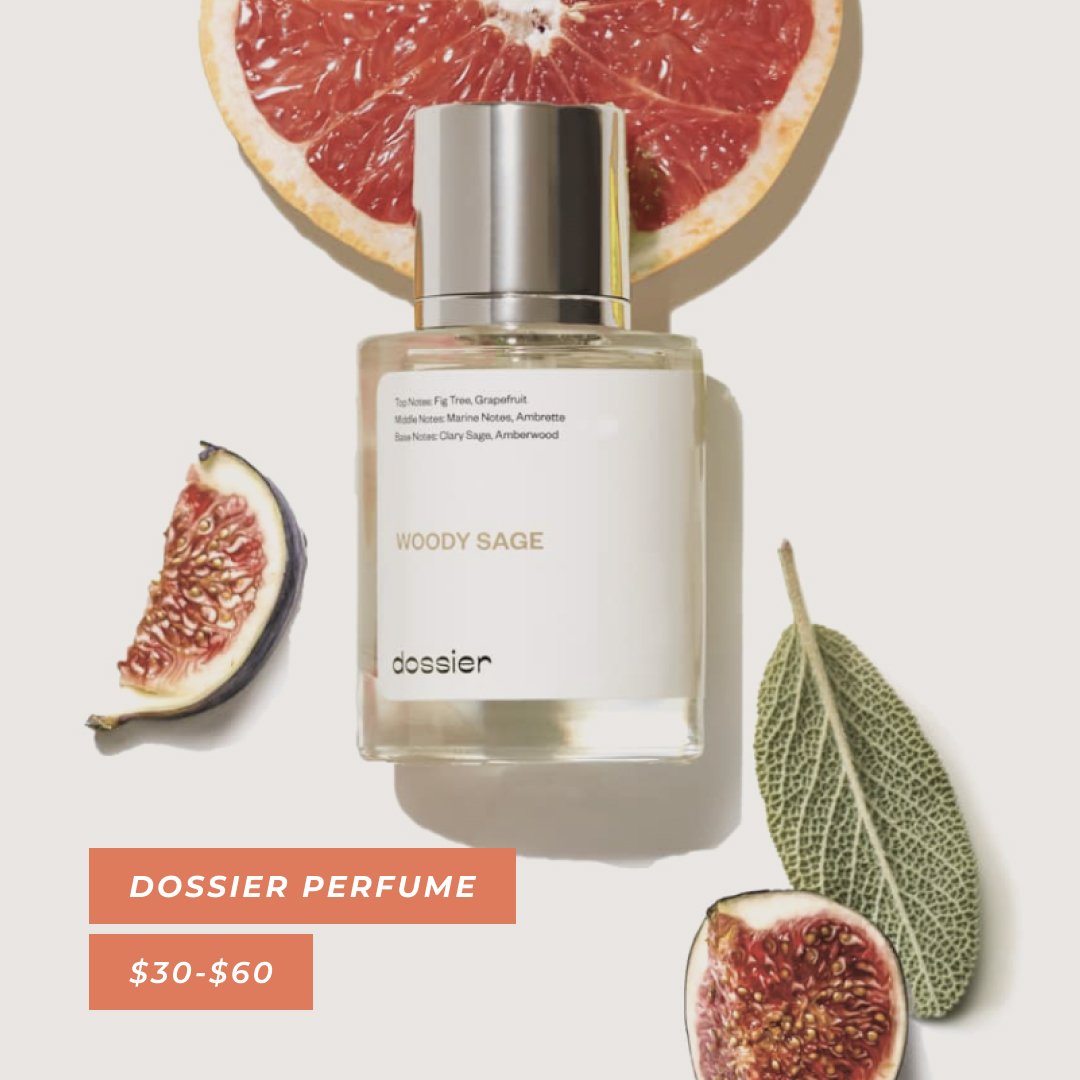
Dossier’s perfumes are inspired by designer scents—think Maison Francis Kurkdjian, Jo Malone, Chanel, Tom Ford.

My signature scent is Jo Malone’s Wood Sage & Sea Salt. I’m wearing Dossier’s Woody Sage scent and it smells exactly the same.

Dossier hooked up my fellow Money Honey’s with 10% off using the code: MMH10. (Not even sponsored, I just asked!)

4. Chic Sunglasses

We love a 90s glam look! These glasses make a great gift for your adventurous friend. Yacht Week Croatia? No worries if they lose it to the ocean! Plus I love accessories for really dressing up an outfit.

90s Sunglasses 2-Pack: $14 at time of publishing.

5. 10 Foot Charging Cord

IYKYK, 10 foot charging cords are absolutely life changing. It’s a gift I received one as a gift a few years ago and didn’t even realize how great they were until I started using them. Sure, your friend may have the standard 3 foot cable, but this is a real game changer.

Keep phones in reach and still charging at all times! Plus I love the 90 degree lightning cable because if you’re holding your phone on your stomach it doesn’t poke you…which goes to show how much I’m always on my phone lol.

This 3-pack is only $14 so you can gift two and keep one for yourself!

10 Foot 90 Degree Lighting Cable 3 Pack: $14 at time of publishing.

6. Baggu Bags

Sustainable AND chic? It’s a win/win. I love to keep these on hand to gift whether it’s a zodiac sign bag for my friend’s birthday or cute checked ones. These make the perfect gift that they can use all the time, whether running to the grocery store or shopping at the mall.

My favorite ones are the standard size Baggu bags. They hold SO much, plus the designs are always on point. I like to always have some on hand to gift in a pinch. And they make great white elephant gifts!

3-Pack: $36 // Single Bag: $12 at time of publishing.

7. Quince Silk Pillowcase

Your bestie might not splurge on this for themselves, but this is the ultimate luxurious gift that they would be so happy to receive. Gift it to your friend so they can wake up without bed head!

This Quince Silk Pillowcase is a dupe for the $90 Slip pillowcase. It’s the exact same quality for less than half the price.

Quince Silk Pillowcase: $40 at time of publishing

Hope you enjoyed my Bougie on a Budget Gift Guide! Let me know if you have any good gift ideas to add in the comments below.


Disclosure: Some links on my site are affiliate links, meaning, at no additional cost to you, I may earn some compensation. All opinions are 100% my own! I truly appreciate you and your support. :)

What I Spend in A Week in LA as a Girl on FI/RE

Today I am sharing my money diary—what I spent a week as a visual designer pursuing early retirement and living in Los Angeles, California!

As a reminder, I'm a 29 year old currently living at home with my parents. I chose to move home to save money to work my way towards financial independence even faster.

But this week I’m back in LA crashing at a friend’s house. Since I lived in Los Angeles for 10 years prior to moving home last year, I don’t really think of LA as a vacation. It’s my home away from home. 

My spending is going to be pretty normal, since my friends here don’t play tourist or entertain me. That means buying my own groceries and doing my own thing. It's the perfect situation to share with you as a person striving for FI/RE (Financial Independence/Retire Early) how I think about spending money.

I am collaborating with a couple of my other Youtube personal finance and FIRE friends. Here’s the link to their money diaries so you can binge watch all of our money diaries and see what we spent in a week.

Day 1

To start off the week I'm meeting up with my sisters to go plant shopping. I don’t think I’m going to get anything, because I don’t live here and don’t need anything.

Okay who am I kidding, I love a good plant, so I end up getting one BUT it's not for me. This plant is called a ZZ plant and I got it as a gift for my friend for letting me stay at their place! I am not stingy when it comes to presents for others. Plus I just loved how it looks!

It kind of looks like The Sill but without The Sill prices. You pay so much for the brand markup! 

Screen Shot 2021-02-19 at 4.33.35 PM.png

It is kind of annoying because each part was separate—the coaster ($2), the pot ($8), and the plant ($12). Of course I'm gonna get the coaster because I don't want the water to come out of the drainage hole and go everywhere. 

The total should’ve been about $24.70, but when the Venmo settled, I somehow ended up paying for a portion of my sister’s plants too. No, I’m not so stingy as to charge my littlest sister a few bucks! However this is a spending diary so I feel like I need to clarify the prices for each thing I bought.

Plant: $27

I go to Trader Joe's and try to be not too awkward about vlogging. I’m getting groceries for the week and trying to stick to Mexican style dishes. But I spot a few new things I want to try like the Everything But the Bagel chips and toss those into the cart too. It’s been so long since I’ve been grocery shopping on my own! 

Even when I lived on my own I really was terrible at guessing how much food I needed for a week and never planned my grocery list. I usually stick with a theme. This week's theme was Mexican-inspired food—taco bowls, taco salad, salmon tacos, etc. All of the ingredients can work in any of the dishes, so I minimize food waste.

I don't really budget either. (I have a whole video on that.) But if I look at my previous grocery spending from years past, I only usually spend like $60/month on groceries. It's been a while since I've grocery shopped on my own and my bill shows it.

Trader Joe’s: $106. 39 

Day 2

I realized I forgot some of my makeup at home. Since I’m filming my Youtube videos down here, I ordered a few things on Amazon. I got a contour palette and two little eyeshadow palettes ($3 each). I wanted something cheap that does the job because I have stuff at home.

Screen Shot 2021-02-23 at 7.37.43 PM.png

I also forgot a notebook so I got a two pack of dotted, leather-bound notebooks for $15. I got all this stuff on Amazon and spent a little money on that!

Notebooks & makeup: $34.04

I’m making a salad for lunch because I have dinner plans, plus I bought all those groceries. I made a salmon taco salad with Green Goddess dressing—nice and refreshing!

My friend, Rae, suggested Roberta’s in Culver City for dinner. She’s been raving about the bread and I really wanted to try it. The meal was literally SO good! We got a pizza, a salad, and the most scrumptious fresh bread with cheese. I also got a refreshing hibiscus cocktail.

Dinner: $59.65

Afterwards, we walked over to Van Leeuwen’s ice cream. I got the brown sugar ice cream with cookie dough and brownie bits. DECADENT!

Ice cream: $6.75

I love spending time with my friends. These are the experiences that I really find value in spending on, even if it means paying for parking in LA.

Parking: $3.00

Day 3

I thought I wasn't going to spend any money today, but I did. I bought TubeBuddy.

I've watched so many YouTube videos on the importance of improving your SEO. It helps you figure out what is popularly searched and how to grow your YouTube channel. All these major YouTubers use it! 

Since I’m at 700 subscribers (at time of filming) and am growing pretty quickly, I wanted to take advantage of it being 50% off before you hit 1,000 subscribers, otherwise you have to pay the full price. This is how they get you!

Screen Shot 2021-02-23 at 1.51.56 AM.png

I know this business in and of itself will pay for that. I already have $70 dollars in Google Adsense revenue from my blog. Although you don't get paid out until you accrue $100, I know I’ll make the money I spend on TubeBuddy back and then some.

Plus by increasing my YouTube SEO, hopefully it improves my blog SEO too. I can write better titles and use them across all my content platforms. I have a whole article on how I’m making money from my YouTube videos, which if you’re a small Youtuber you should definitely check that out. But that's how I validated that purchase.

TubeBuddy annual subscription: $43.20

For dinner I made a poor man's pizza. I used leftover flour tortillas and Trader Joe's marinara sauce, which is basically the same as pizza sauce (right?). My friend let me take all the cheese leftovers, so I made a pizza out of it! Can’t let leftovers go to waste!

Day 4

I just finished work and was so busy I didn't have time to spend any money even if I wanted to. The sheer amount of hours I spent in meetings today made me realize (just kidding, didn’t make me realize) reminded me why I want to achieve financial independence ASAP. So yeah, I didn't spend any money today, good and bad, for better or worse, richer or poorer, yadda yadda. 

Now, I'm gonna go eat a snack from my Trader Joe's haul. I definitely bought too much stuff for one week. I think it’s enough food to last closer to 2 weeks. I've eaten less than half and it's been half a week. I guess I gotta stay another week in LA to eat all my food! After that I’m going to meditate and do yoga. My first no spend day!

It's my quarterly goal to do yoga every single day even if it's only for 10 minutes. Being consistent with these daily micro habits is better than not moving my body at all, which is what I normally would do. I use the Down Dog Yoga app, which is free, changes the routine up every time, and has some good yoga jams.

Yoga: $0

Day 5

I’m about to head out to go to Starbucks since I have a gift card. Since it’s a gift card, I'm not gonna count that towards my spending. There's a nearby park and I'm going to meditate, enjoy my coffee, and journal there. I've always wanted to do this because I'm not a very introspective person...probably because I'm always connected to technology and don't really have time to think. I thought today's a good day for that! 

WARNING: Sexual harassment incident described below. I documented my thoughts immediately after attempting to process what happened.

Screen+Shot+2021-02-23+at+7.43.15+PM.jpg

Oh my god. I was walking to get my coffee and a guy rode by on his electric scooter on the sidewalk and literally slapped my ass. I've never been sexually harassed but I'm really scared now. I wish I'd gotten a video, but I was so shocked. 

I was like, what the F!$k, dude?!? You can’t just do that! And he was like, oh, I'm sorry.

NO, YOU’RE NOT!

That guy sucks. I don't know if I should go home or keep trying to walk. I'm feeling very confused and angry and upset...

I decided to continue to get Starbucks because I'm not gonna let this dude ruin my day. 

Starbucks: $0 (gift card)

After that I headed to the park to journal and meditate. I was literally about to do a dissipate anger meditation and then *BOOM* a baseball hits me square in the chest.

Have you ever been hit with a baseball before? Well let me tell you, it hurts 🤬!

At that point I lost it. I started sobbing uncontrollably.

I look up and see a little boy staring at me. The dad, who was playing catch and had missed his son and hit me, runs up to grab the ball apologizing profusely.

Through my tears, I was like, no it's not you, I'm having a really rough day.

I posted about the incident on my IG story and everybody was so nice. Many told me it’s okay to cry and heartbreakingly shared similar experiences.

I didn't want to cry, but after the ball hit me I was SO overwhelmed with feelings. Hitting random women is never okay!

Clearly the universe is conspiring against me, so I packed up and called my sisters crying. One of them works really close by so she's like oh, I'm coming. I'm six minutes away, we're gonna get you Mcdonald's. I love my family.

Day 6

It’s going to be a good day. That is my mantra today. I'm meeting my friend for coffee. I needed a little pick-me-up to get the day going before work after yesterday.

I honestly forgot how bad LA parking is. The worst!

Parking: $2

I meet Laura at Good People coffee and order an an ube latte. Whenever I buy coffee I try to get things I can't make at home. I also only really get nice coffee if I’m meeting up with a friend or as an experience like I tried to have yesterday.

Coffee: $8.51

Day 7

I'm actually half Chinese and half Japanese American. My friend from Shanghai hosted a Chinese New Year meal of dim sum in the backyard of my old spot in LA. Everything was so delicious.

I wanted some coffee so I could go home and edit YouTube afterwards, so we walked to go get some. To be honest, the Horchata latte I got from Mañana Coffee was way too sweet, but the journey was still worth it.

Total & reflections

Thanks for spending a week with me in Los Angeles. I hope you enjoyed all the highs and lows, certainly some lows, but lots of highs. I loved documenting this process, it was so fun! For my grand total I spent...

TOTAL: $296.39

That isn't too bad and if I multiply that by four, it's about $1185, which isn't horrible for a month.

For context, I’m living at home I'm not paying any rent or utilities, so no expenses like that. I get a paycheck weekly and after taxes it’s usually around $1,200. But at the moment I am front loading my 401k, so my paycheck is $0. I prefer to front load instead of dollar cost averaging because I like to spend more time in the market. 

Between taxes and putting 75% of my paycheck into my 401k, I basically get nothing. I’m doing that this year since I’m taking advantage of living at home. 

Right now I am living off of $3,000 checking account and then I have my emergency fund with 6 months expenses that should cover anything, since I'm not getting paid for the next several weeks. That is my current paycheck situation, it should return to normal at the end of March.

Again, I'm a visual designer working in tech. I make six figures a year and you can check out my wealth journey to get a full picture of my salary timeline. I used to make $22,000 starting out and have slowly over the course of eight years worked my way up to my current salary.

This was so much fun to take you behind the scenes and show you how I spend my money as a girl on FI/RE. I hope you found it insightful and if you did be sure to subscribe to my channel below so we can spread the FI/RE.

I want us all to get rich and retire early together! xo


Disclosure: Some links are affiliate links, meaning, at no additional cost to you, I may earn some compensation. All opinions are 100% my own! I truly appreciate you and your support. :)

Make Money From Youtube Without 1000 Subscribers or 4000 Watch Hours

I actually make money from my YouTube channel and no, I'm not monetized yet. As of today I only have 779 subscribers and well below the 4,000 watch hours you need to qualify for Youtube's Partner Program. It’s been 3.5 months since I started my Youtube channel and I’m already making money from it! If you’re a small YouTuber as well, I want to tell you exactly how you can as well!

Before I get started, no this clickbait title was not my intent. It is truly what I do and I don't see enough people talking about this process! I've watched a couple of other videos on “How I monetize my YouTube videos without being monetized.” They mostly suggest affiliate links, merch, things of that nature, which I'm totally not opposed to. In fact, I have a whole article on those types of "lazy” income streams. I'm talking about actually getting money from your already created Youtube content.

There are a couple things you need to think about to set up this process, which once you lock down this workflow, it will be a lot easier in the future!

1. Set up a blog

The first thing you're going to want to do in conjunction with starting your YouTube channel is start a blog. I personally use Squarespace because it is so easy to use and update on the back-end. That ease of use really makes it worth it for me. For more affordable alternatives you can create your own self-hosted Wordpress blog or Blogspot is a free alternative.

If you're not sure if you're going to be able to keep up with this content creation I would not advise you spend $200 on Squarespace quite yet. For me, I know I'm going to be consistent with these finance related Youtube videos. I've run my IG account, @millennialmoneyhoney, which I've maintained for 2+ years. Plus, the amount of money I can make through this blog will cover the expenses of my website.

If you're still interested in using Squarespace and you know you will stick, you can use my link to trial it and see if it's actually right for you. (You’ll need to do the business plan, but more on that ahead.)

2. Apply for and set up Google AdSense

Now that you've set up your blog, it’s time to apply for Google AdSense. Since you're already a YouTube content creator, it makes sense to apply for this anyway. You can apply for Google AdSense, which is how you would be paid on YouTube, prior to hitting your 1,000 subs and 4,000 watch hours. You'll have that set up and ready to go when you finally do get monetized! Through this, you’ll also be able to monetize your blog. 

This is why Squarespace costs $200+ per year for the business version. You’ll need to pay for that upgrade to be able to add Google Ads to it. Again, this is what works for me but if you're still playing with this idea,  be sure to check out some free options like Blogspot or cheaper options like Wordpress. 

Google search how to install AdSense onto your specific blog platform that you end up with. I turn on the auto-placement ads to just maximize the visibility and have Google do all the work for me. You could also put in ads only in places where you choose, but you may lose out on the opportunity to get paid more.

These two steps are one-time steps, so once you've set up your blog and applied for Google AdSense and installed AdSense on your blog, we're gonna take it back to YouTube. This is where we start makin’ that bread.

3. Make a Youtube video and upload it

First you're going to film your video and make the content. Duh. I personally prefer to film it unscripted or with very light scripting. I used to do a full script, but then I was reading it and it didn't come off as natural or as candid even though I said a lot less “um’s” and “you knows” and “likes.” Unscripted talking to the camera makes it a little more natural for me and I want to maintain that authenticity, so I do not script my videos. I go full send with a very light outline. 

Once I film the video, I edit it, and then I upload it to YouTube.

4. Use TubeBuddy to optimize SEO

I recently started using TubeBuddy to help me build my title, tags, as well as the video description. This helps me rank higher in search results and get a better grasp on what people are searching for. I’ll also be able to use the title and description across everything else.

You can see this title is getting between a good and very good score!

Screen Shot 2021-02-23 at 1.15.48 AM.png

If you have under 1,000 subscribers, TubeBuddy is 50% off and only $40.32 for the year! So be sure to take advantage of that discount if you’re still a budding Youtuber like me. I’ve watched a lot of videos on this and although it is primarily for Youtube, I think it will be useful for general SEO performance. I’m testing out optimizing my SEO on this blog (starting with this article, in fact)!

5. Transcribe your video using the subtitles

YouTube basically scrapes all the audio that you have spoken and transcribes it for you. It takes a few hours after uploading to transcribe it so be patient. Once they’re ready, go to edit your video, then click on Subtitles to the left. Click the Duplicate and Edit button to pull up the subtitles and copy all of that. You can exit out and don’t need to save any changes. This is the content for a blog post.

Youtube Subtitles

Right now they are looking pretty incoherent. Paste those subtitles into a Google doc. Then start finding and replacing words like “i” → “I” and removing “ums” and “uhs.” By going through and editing it, this becomes the blog post, which you are reading RIGHT NOW! 

For those who write a fully fleshed out script, boom, you already have your blog article ready to go! There's no need to even transcribe your video.

6. Make a blog post from it

Take the copy transcription text and go over to your blog. I duplicate an older blog post to start off with. Then I go in, select all of the old text and replace it with my freshly transcribed audio.

Squarespace.png

Would ya look at that?! How meta. Then I update the video player at the top and replace it with the new Youtube video link. I put in the custom thumbnail for the video and insert it as an image to the very bottom of the blog post. I schedule the blog post to drop at the same exact time as my YouTube video so that the video will be playable.

In the SEO tab I copy and paste the short Youtube description that I created using all of the keywords from my title with the help of TubeBuddy.

7. Pin your blog post to drive traffic

Once the post goes live, I take the image of the thumbnail and pin it to Pinterest. This will help drive organic traffic to the blog as most people on Pinterest are expecting to be linked to blog articles to learn more.  It’s not the best practice to link your Youtube video directly there.

I used to create separate Pinterest images that were square or taller versions, which may perform a tiny bit better, but it was an added another step that I thought that was unnecessary. Using my YouTube thumbnail doubles up and works just fine. We are maximizing content here!

If people click on a link from Pinterest, it should take them directly to the blog article that corresponds to it, not just your site. 

Because your blog will have Google ads running on it, you’ll get paid any time you have traffic coming to your site. Be sure to promote this blog post on all social media platforms you have—Instagram, Facebook, LinkedIn (if it makes sense).

6. Turn your video into a podcast

Finally the last thing I do is turn my Youtube video into a podcast through Anchor.  Anchor is a free podcast hosting site that allows you to take your Youtube video and turn it into a podcast. It also distributes it through platforms like Apple, Spotify, and more.  It's so great! You literally don't have to do anything.

I have a pre-recorded intro that I use over and over again saying, “Hey, this is the Millennial Money Honey Podcast and this is the audio from my YouTube video. If you want to go check out the live version of me speaking go check out my YouTube channel.” This way listeners will understand why I'm making some Youtube specific references, like “hit the notification bell” or “check out the description below.” This way they’re less confused because I’ve prefaced that it’s the audio from my YouTube channel. 

At first I was trying to edit the YouTube audio to cut out the parts that were YouTube specific, but that was too much work and I stopped. This new way I’m able to not do any additional work! I truly believe in the mantra of working smarter not harder.

Screen Shot 2021-02-23 at 1.30.52 AM.png

Anchor also makes it easy for sponsors to approach you. Right now I don't have any actual sponsors, but you can always be sponsored by Anchor and they will pay you a small amount any time someone listens to you advertise their platform.

Again, I take my TubeBuddy SEO optimized description and title from my YouTube video loaded with keywords that will help me rank higher in searches. This also just makes it plain easy to fill out the podcast description!

My earnings

Before I show you my Google AdSense earnings I want to preface that I've had my blog set up since December 2019 and had made $24.75 before I started this Youtube to blog post process. 

Google Adsense Blog Revenue

You can see that I currently have $69.31 + $17.03 or $86.34! I only started pushing out weekly articles since I launched my YouTube in October 2020. As a result my Adsense earnings have increased significantly. This month alone (Feb 2021) alone I made $17.03—over half of my previous year’s total earnings. Google AdSense earnings don't get paid out until you hit $100. I think definitely in March 2021 I will receive my first Google Adsense paycheck!!! I'm very excited.

I basically promote it on all my social media accounts in addition to driving traffic from Pinterest. As a result, more people are viewing the site and generating more AdSense revenue. I’m sure YouTube ads pay better, but this will do for now!

Anchor Earnings.png

I've made $4.05 n Anchor at the time of me writing this blog article! It pays out at $15. I literally have never promoted my podcast. Not even once! But the content is already made, so you may as well milk all the money out of it.

If you made it this far, congrats! Hopefully this is how you too can start earning money using Youtube content that you have already made! If you liked this article and are planning to monetize your YouTube videos this way be sure to subscribe to the Millennial Money Honey channel below. It’s free and helps me so much!

Let's get rich and retire early together! xo


Disclosure: Some links are affiliate links, meaning, at no additional cost to you, I may earn some compensation. All opinions are 100% my own! I truly appreciate you and your support. :)

My Wealth Timeline: Growing my Salary from $22K to $100K+

Everybody starts with a knowledge base of zero, including me. I had no idea that it was possible to make and grow my wealth to where it is today. I started off earning $22,000 per year after college and have since grown and negotiated my way up to earning over six figures! I’m here today to tell you exactly how I did it.

WealthJourney+1.jpg

May 2013 - Graduated from college

I studied cinematic arts in college. (Legit the furthest thing from stable steady finance job you could get 😂.) Even the dean upon graduation gave a speech to parents telling them they can expect to continue supporting their children for a year out of college. Graduated college with no student debt, thank you mom & dad!

August 2013 - $11/hr

I finally got my first job in entertainment marketing. I did not negotiate AT ALL. And yes, my parents still had to help with rent as the dean anticipated.

July 2014 - I QUIT!

The job was toxic. I was legit told by the only female boss in there when I went to talk to her, to keep my head down and continue putting up with “the boys club.” They wouldn’t even refer to me by my real name…that’s how terrible it was. She told me to keep doing good work and eventually they’d respect me. I came home crying every other night and finally knew it was time to go. I legit got out of there thinking I was sh*tty designer…it took a toll. My parents did not understand why I would quit a job without something lined up and encouraged me not to, but I did.

My roommate, who was also in a toxic job quit around the same time and in the 3 months we were looking for a job we took little frugal camping trips. We explored Zion National Park, Yosemite, the redwoods, and went up north to the bay area.

October 2014 - Meaningful Work $15/hr

After my experience in entertainment marketing, I knew I had to find a job with more purpose than getting people to buy a movie ticket. I finally landed a job whose mission it was founded on was to give back. I again didn’t negotiate when they offered me $15/hr (no overtime) because it felt like way more than $11/hr .

WealthJourney+2.jpg

June 2015 - $25/hr

I honestly didn’t realize how littler $15/hr was at the time so this was a huge promotion. When initially I got brought on in October of 2014, I had been told it was just a short hiring freeze and they’d hire me soon. I naiively just assumed it was out of my control and never asked about anything fulltime unless my manager brought it up.

October 2015 - $65,000/yr

In retrospect I wish I had advocated for my hire more, but finally got brought on fulltime one year later. This salary was so astronomical I didn’t negotiate it at all I was just so grateful. My senior copywriter friend insisted I push back a little bit to make up for that lost year, but again I was too afraid.

December 2017 - The Start of My Personal Finance Journey

I finally was saving enough money that I decided I needed to do something about it. I took inventory of all my assets (aka calculated my net worth) in anticipation of a 401K advisor coming into the workplace to talk over financial plans for free.

She said I was doing everything right and I coudl probably increase my 401K contributions to continue saving and maybe even a open a 529 plans if I really wanted kids. I decided to increase my 401K to 12%, opened my first credit card (Citi 2x Cashback) and started investing through what I felt like was the easiest method, Wealthfront’s robo-advisor.

I was research I did through this comparison article on Nerdwallet. I ultimately choose Wealthfront over Betterment because I liked Wealthfront’s design better.

December 2018 - $85,000/yr

The next two years I would receive a standard 3% cost-of living raise and a small bonus, bringing me up to $70K/yr. But in 2018 I start pursuing new opportunities (THANK U LINKEDIN JOBS, which let recruiters know I was available.) I was recruited to work at an ad agency. I made a huge leap from $70K to $85K. I knew you could earn more, but I didn’t realize how much more that would be by switching jobs.

I had two offers on the table both at $85K. I tried to negotiate more on both but they said it was at the top of the budget. One role was at a small energy tech company and the other a major ad agency. I think I would have actually enjoyed the smaller company more, but I ended up at the ad agency because it was a big name and so many people look for creatives with agency experience.

WealthJourney+3.jpg

April 2019 - My first $100K

I had been automating my finances since December of 2017 and really did not track anything too closely. One day I opened my Weatlhfront app and realized I had hit $100K net worth in April. It was revolutionary! It was about this time that I had also started building a personal finance presence on Instagram as a hobby.

August 2019 - $70/hr

The role I had left at the ad agency was not everything I had anticipated it would be. The client I was on was difficult and not open to innovative ideas. I felt stifled as a designer. It was so bad that I felt like I couldn’t even add anything to my portfolio, which meant it was time to go. A few friends had mentioned that I’d enjoy contracting and freelancing and that I could make a lot more that way too.

I had a 5 year plan to move into the tech world and get up to the bay area to be closer to my family. When a 3 month contract opportunity came along at a major tech company in Los Angeles, I dove head first even if it wasn’t full-time. The contracting agency had full benefits and although they initially offered $65/hr, I negotiated up to $70.

September 2019 - FI/RE!

I had been posting about personal finance for awhile on Instagram when a friend mentioned to me that I should look into Mr. Money Mustache’s blog and learn more about FIRE.

When I finally did, my whole world changed forever. I started reading personal finance books, tracking my spending and binging all the Youtube and Podcast videos.

December 2019 - No work December

With the holidays approaching and my contract ending, I decided I didn’t want to even try to take on any new jobs through the rest of the year. Leveling up my finances and building a solid emergency fund allowed me to intentionally not work. I loved it so much I even extended that into the beginning of January.

WealthJourney+4.jpg

January-February 2020 - Freelance $80/hr

Mid January to February I earned nothing, but I did pick up a few freelance clients. I announced publicly on my social media so my network reached out to me some opportunities. I highly recommend doing this if you’re trying to get new clients. My rate was higher than ever, but I knew I didn’t want to do it.

I also learned I did not like the lack of structure that came with the freelancing territory. When the choice was do work or watch Netflix….it almost always came down to the latter until the panic monster set in. I started looking for a steady contracting job in tech in the beginning of February.

March 2020 - $58/hr

I ended up landing a job at another big tech company for a year. I was so excited about everything EXCEPT the pay. But the team I’d be on, my role, and the fact that I could try living in the bay area for one year outweighed that negative. In the end it wasn’t about the money. That amount still pushed me in the 6 figure range so I was content. I can honestly say I’m so happy where I am right now!

July 2020 - $200K Net Worth

I reached my next next worth benchmark in the blink of an eye and am climbing my way to the next. I decided to learn to rebalance my own portfolio (with the help of my hand dandy rebalancing spreadsheet) and slowly stopped using my robo-advisor.

I’ve learned that it’s not always about the money, sometimes it’s about the experience and happiness that a job brings. Here’s to growing all of you wealth and sharing experiences so we can all grow rich!

xo,

Catie


Disclosure: Some links on my site are affiliate links, meaning, at no additional cost to you, I may earn some compensation. All opinions are 100% my own! I truly appreciate you and your support. :)

Pinterest 2.jpg

Sustainability Starter Pack: 6 Simple Swaps to Save Money (and the Planet!)

Sometimes being sustainable feels like a hard ask. I get it! That’s why I wanted to share with you the 6 easiest, most mindless swaps that help save you money and help save the environment.

1. Reusable Water Bottle

If you’re looking where to start, look no further than the humble reusable water bottle. Not only does it reduce plastic water bottle usage, which takes years to biodegrade, but it also is chic and cute. I like water bottles that are super great at insulating the cold! Mine keeps ice in there for over 24 hours.

Hydroflasks are a very popular, and trendy option, but there are also great options on the market that do the same job for less. I personally use a TAL 64 oz bottle. (Be sure to use Rakuten with it to get 6% cash back!) This way I know I only need to drink one bottle of water per day and I can tell if I’m not on track!

Stay hydrated, save money, and the planet. WIN-WIN-WIN! :)

2. Fountain Pen

Sustainability but make it fashun! This year I started using a refillable fountain pen. I use a Pilot Metropolitan. When I did my research, this was a good, basic, beginners fountain pen. I needed something easy.

My dad actually started using them years ago because the pressure it takes to write with the fountain is a lot less than the grip you need with a standard pen. He ended up switching to fountain pens for that reason, but I was more interested in the sustainability and sexiness factor. This is a sexy pen! It’s heavy and the nib looks very fancy. There are really fancy ones you can get on Amazon for like $12, so it doesn’t even cost that much to get started.

This one came with a fountain pen and an ink refill cartridge. You’ll take an ink cartridge, put the end into the inkwell, and squeeze the rubber part until the ink stops bubbling. That’s when you know it’s full of ink. Then you unscrew your fountain pen and load the ink cartridge in. It’s super simple once you get the hang of it.

Pilot Metropolitan: $23 at time of publishing

It’s also ergonomic and you don’t have to put a ton of pressure on the paper when you write which causes your hand to get cramped up and callous. It saves you a ton of money and makes you more conscious of keeping track of your pen. This is the only pen I use now. It’s made of all metal, no plastic like those cheap pens you buy.

I really love using this fountain pen. It feels luxe and not only does it make you feel luxe, it saves you a lot of money from ever having to buy another pen again. Again, I use a Pilot Metropolitan, a great beginners fountain pen, but I highly recommend you check out any reusable fountain pen.

Pen: $14.99 // Ink: $11.29 at time of publishing

3. Wool Dryer Balls

Another super easy swap is getting dry balls. I like the wool one’s because they’re all natural and non-damaging. The dryer balls cut down your drying time, the natural motion from the balls bouncing around in the machine helps to beat the water out even quicker and keeps all of your clothes feeling really soft without having to use dryer sheets. Which even knows what’s in those dryer sheets—I don’t.

I really like using these dryer balls in place of dryer sheets. They keep my clothes soft, cut down on the drying time, and I’m not buying dryer sheets ever again.

$6.99 for pack of 6 at time of publishing.

4. Safety Razor

Honestly, I can’t think of a reason not to switch to safety razors. In addition, to giving a better shave and reducing irritation, they are less expensive and more eco-friendly than normal razors. Seriously, what more could you ask for? One handle will last a lifetime, and the blades (which come in bulk!) can be recycled at your local recycling center.

I specifically like a butterfly safety razor because it’s easy to twist open and replace the blade. It goes right on top and that’s the only thing you are really replacing. For a pack of 100 blades it cost about $6-$7. Traditional razor-heads for women are really expensive and add up so quickly. So for a pack of 100 of these razor blades you could change it out every couple days and you’d be gold in for the entire year.

Vikings Blade Chieftain: $29 at time of publishing.

I will say, it takes a little bit of a learning curve. And something that I miss about Traditional razors is the pivoting head that gets inside all the curves and your curvy lady parts. Razors were designed by men for men way back when to shave their beards and that area is easier to get to. So it takes a bit of an adjustment getting used to the weightiness of a safety razor and the feeling of a single blade. 

A modern woman’s razor has like three or four blades. This one only has a single blade, so that way it’s not cutting so close to your skin. When you have that many blades, it cuts the hair below the skin, which is how a lot of people get razor burn and ingrown hairs. This is actually something my dad turned me onto because he was getting a lot of ingrown hairs and I do too under my armpits. The switch to a safety razor has helped a lot with that.

Safety Razor: $16.98 // Razor Blades: $14.97 for pack of 50 at time of publishing.

Something I am interested in trying out is a Leaf Razor ($84 at time of publishing). It has a lot of the same properties of a single blade safety razor, but they modernized the design to have a pivoting head. It’s also made of metal, plastic-free, and you use single blades. You can put in a single blade, or it can hold up to three which is nice to have that option.

The Leaf Razor is more of an investment, but a beginner safety razor will run you about anywhere from $15-$30. It’s a worthwhile investment sheerly from not having to place your razor head over and over again.

5. Shopping Bags

Living in California we actually have a plastic bag ban. That means whenever you go to the grocery store they will charge you $0.10 if you don’t bring your own bag to reuse. Obviously it’s a financial incentive for people to bring their own reusable bags.

I keep like 5-10 bags (probably an excessive amount) in my trunk just so that they are always handy even if I bring some in and forget to put them back. That way I’m ready to go and can pull it out when I’m ready to do my grocery shopping. It’s really very low effort to remember to bring your own bags. At this point it’s a habit.

My favorite ones are the standard size Baggu bags. They come in a ton of fun prints! I have a shark one, a llama one and one of my favorites is one that’s made to look like a classic plastic one.  Since I am a designer I really like bags that are cute and aesthetically pleasing and not only that but they’re super, super functional.

3-Pack: $36 // Single Bag: $12 at time of publishing.

If you’re going to be sustainable, you want to make it fun and have the things you use spark joy whenever you go to use your bags. It sparks joy when I’m packing my groceries up. 

These can carry like 3 gallons of milk and it will still hold up. I only need two or three per grocery trip, but the sides expand. There’s extra space on the sides so you can hold a lot of stuff in this bag. I love my Baggu bags. They’re super functional and practical. They fold up into these nice little pouches. I think they are about $12-$16 and they have new prints every year.

I really like to give these as stocking stuffers or a white elephant gift because I’m so practical. I'm like well this is totally something anyone can use even if they aren’t as eco-chic as you. Everybody could use a large nylon tote, right? I have been known to even steal these back at my own white elephant parties. Not gonna lie, I brought as my gift and definitely stole it back. So think about that for your next white elephant party, if you have any this year…although who’s having white elephant or Christmas parties this year. *WOMP*

6. Rechargeable Batteries

This is not as fun as my reusable bags, but this product is something I use all the time. It runs many of the little appliances in my life and it’s so behind the scenes but it’s always good to have these on hand and that is rechargeable batteries.

Whenever I have a little appliance, like the clock on my wall, and the batteries die, I replace it with a rechargeable battery–my coffee foamer, all of my flashlights I use for camping, literally any little thing that uses batteries. It’s just a matter of having enough extras on hand so I can recharge them. Usually things don’t run out at the exact same time so I have maybe four on hand that I can use as my reserve.

Rechargeable Batteries + Charger: $14.97 for pack of 50 at time of publishing.

I got a rechargeable battery set a couple years ago and it’s really great. The charger I have is for AA batteries and it can also charge AAA batteries. Rechargeable batteries are the way to go. Batteries themselves are so expensive and if you find yourself running out of them a lot it really adds up. Not only does it add up monetarily but batteries aren’t great for the environment, so it’s great to have these rechargeable ones.

Just like your phone, the batteries degrade overtime. Eventually you would want to replace them, but for the years and amount of use I get out of these, these are SO worth it.

There are so many ways to help preserve the environment that don’t require you to completely change your lifestyle. I’ve found that starting with small, easy swaps has led to me making more and more sustainable choices. The impact on my day-to-day life is barely noticeable, and it saves me money in the long run! We only have one Earth to live on, which means it’s so important that we take care of it. Have you made any simple sustainable swaps recently? Share your eco-friendly hacks in the comments below!

Save your money. Save the planet.


Disclosure: Some links on my site are affiliate links, meaning, at no additional cost to you, I may earn some compensation. All opinions are 100% my own! I truly appreciate you and your support. :)

Sustainable Swaps